Brakes on electric bikes are essential safety components that use friction to slow down or stop the bike’s wheels. They enhance rider control and contribute to a safer and smoother riding experience.
Is your electric bike screeching to a halt or feeling less responsive? Don’t hit the brakes on your biking adventures just yet! Discovering how to fix the brakes on your electric bike is simpler than you think. From adjusting brake pads to ensuring proper cable tension, our quick guide will have you back on the road with confidence.
To fix brakes on an electric bike, start by identifying the type of brake system your bike uses—commonly either disc brakes or rim brakes. For disc brakes, inspect the brake pads for wear and replace if necessary. Adjust the calliper position and ensure proper alignment with the rotor.
Understanding Electric Bike Brake Systems
The pedal on an electric bike serves as a critical interface between the rider and the brake systems. Whether equipped with rim brakes or disc brakes, engaging the pedal initiates the braking process, ensuring riders can safely control their speed and come to a controlled stop. This pivotal connection underscores the importance of a responsive and reliable brake system in enhancing the overall safety and performance of electric bikes.
Disc brakes are generally more efficient and offer better performance, especially in wet conditions. Many electric bikes feature regenerative braking, where the motor helps slow down the bike and converts some of the energy back into the battery, increasing overall efficiency.
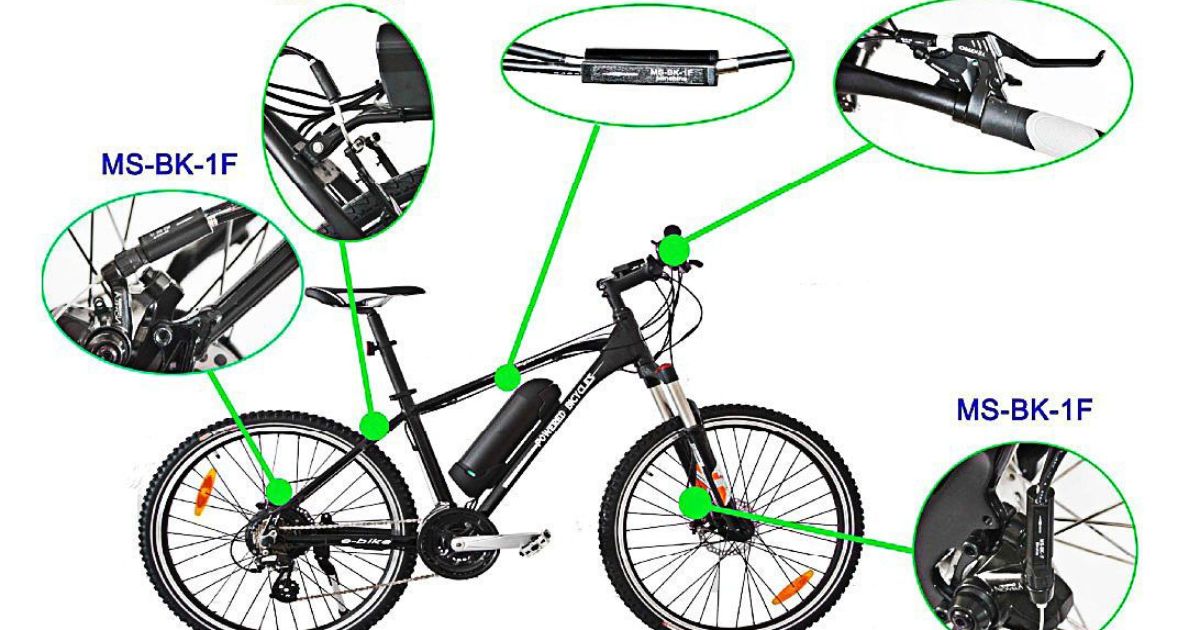
Exploring the Components and Functions
Exploring the components and functions of things involves taking a closer look at their parts and understanding how they work together. Imagine a car: it has various components like the engine, wheels, and steering wheel, each with its specific function.
The engine powers the car, the wheels enable movement, and the steering wheel allows you to control direction. Similarly, in everyday objects or complex systems, breaking down the components and understanding their functions helps us grasp how things operate. It’s like solving a puzzle, where each piece plays a crucial role in the bigger picture.
Safety Precautions Before Brake Repair
Before starting any brake repair, it is crucial to prioritize safety precautions to ensure a secure working environment. First and foremost, make sure to park the vehicle on a level surface and engage the parking brake to prevent any unintended movement.
Wear appropriate personal protective equipment such as gloves and safety glasses to shield yourself from potential hazards. Always disconnect the vehicle’s battery to avoid electrical mishaps, and use wheel chocks to stabilize the vehicle and prevent rolling. It’s also essential to work in a well-ventilated area to avoid inhaling harmful fumes.
Diagnosing Brake Issues on Your Electric Bike
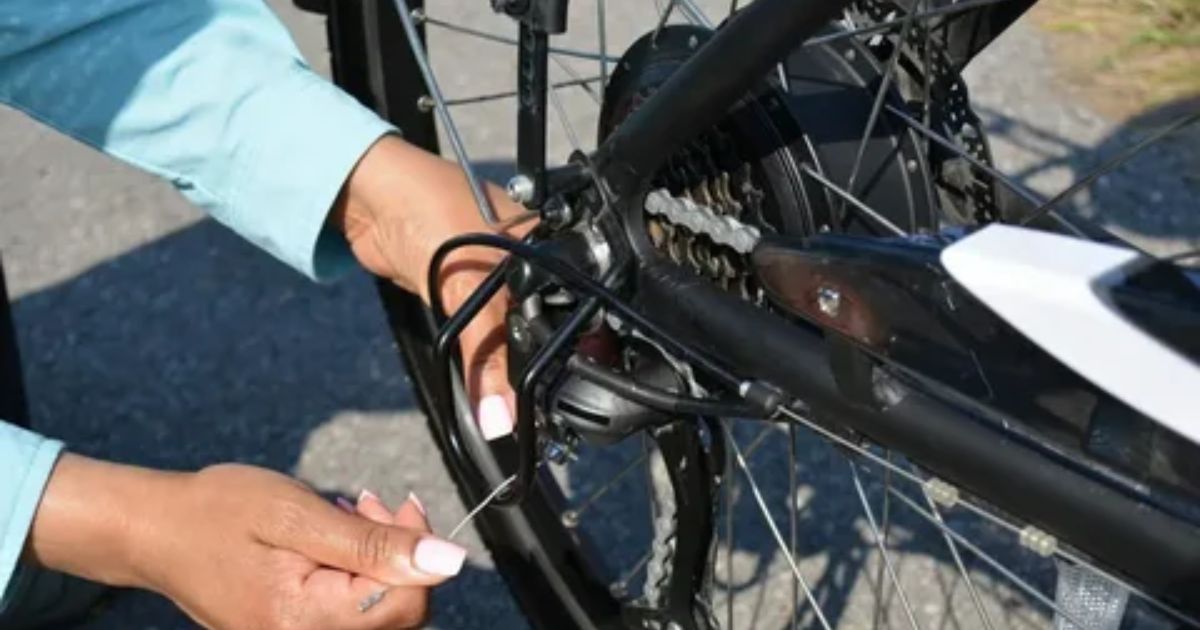
Diagnosing brake issues on your electric bike is essential for a safe and smooth ride. If you notice decreased braking performance, start by checking the brake pads for wear. Worn-out pads can reduce stopping power and should be replaced. Inspect the brake cables for any signs of fraying or damage, as these can affect responsiveness.
Ensure that the brake callipers are aligned properly and tightened securely. If your electric bike has disc brakes, check for any warping or contamination on the rotor. Squeaking or grinding sounds may indicate issues with the braking system, so pay attention to unusual noises.
Step-by-Step Brake Inspection and Adjustment
Visual Check: Begin by inspecting your electric bike’s brakes visually. Look for any signs of wear on the brake pads. If they appear thin or uneven, it’s time to replace them.
Cable Examination: Examine the brake cables for fraying or damage. Ensure they are securely fastened to the levers and callipers. Replace any damaged cables to maintain proper brake function.
Caliper Alignment: Check the alignment of the brake callipers. They should be centred over the wheel rims. If not, use the adjustment screws to align them properly. This ensures even contact with the brake pads.
Rotor Inspection (for disc brakes): If your electric bike has disc brakes, inspect the rotor for warping or contamination. Clean the rotor with isopropyl alcohol if necessary. Warped rotors can be straightened, but severe damage may require replacement.
Brake Test and Adjustment: After visual checks, test your brakes by squeezing the levers. Ensure there is a firm and consistent feel. If needed, adjust the brake tension using the barrel adjusters near the levers. Test the brakes again and make fine adjustments until they perform optimally.
Brake Bleeding For Optimal Performance
Brake bleeding is a simple but crucial process to enhance your electric bike’s braking performance. Over time, air can get trapped in the brake system, affecting efficiency. To bleed the brakes:
Gather Materials: Get a brake bleeding kit, which usually includes a syringe, tubing, and the necessary fittings for your brake system.
Prepare Bike: Ensure your electric bike is stable and on a level surface. Remove the wheel to access the brake calliper more easily.
Attach Tubing: Connect the tubing to the brake caliper’s bleeder valve. Place the other end in a container to catch the brake fluid.
Bleed the Brakes: With the syringe, extract old brake fluid from the calliper and replace it with new fluid. Pump the brake lever to remove air bubbles from the system. Continue this process until clear fluid flows consistently.
Tighten and Test: Close the bleeder valve, tighten any loosened fittings, and reinstall the wheel. Test the brakes to ensure they feel firm and responsive.
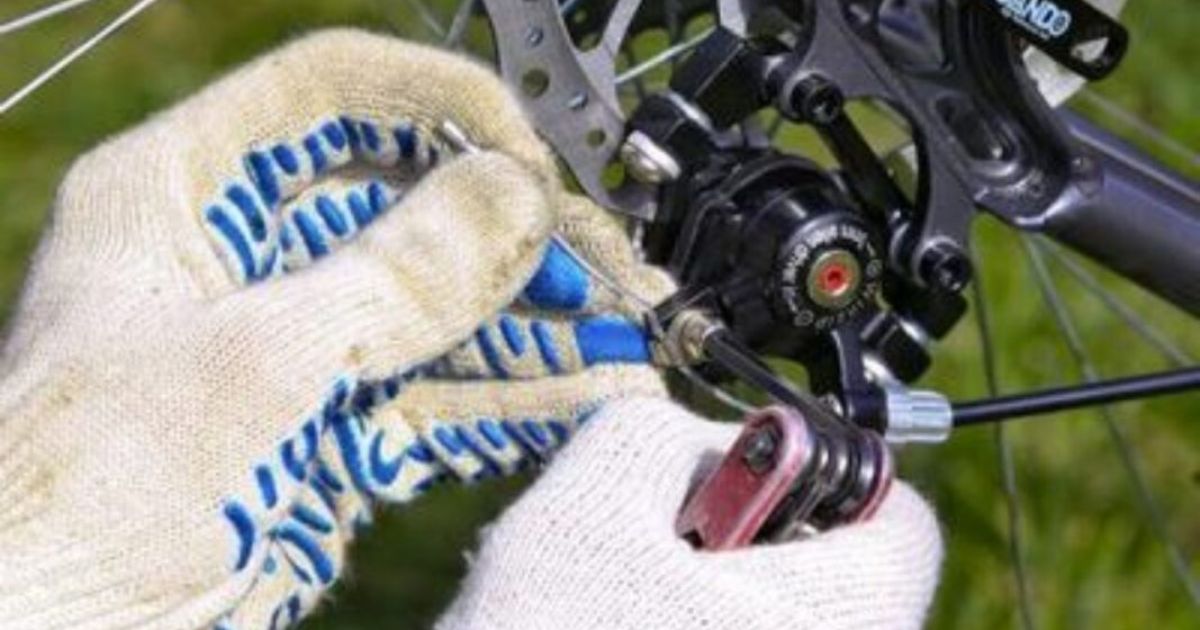
Step-By-Step Guide To Removing Air From Hydraulic Brake Systems
Gather Tools: Start by collecting the necessary tools, including a brake bleeding kit, a container to catch brake fluid, and the specific wrench or key required to open the bleeder valve on your hydraulic brake system.
Position Bike: Place your electric bike on a stable surface. If possible, elevate the front or rear end to allow air bubbles to rise easily in the brake fluid.
Locate Bleeder Valve: Find the bleeder valve on the brake caliper. It’s typically a small screw or bolt on the calliper body.
Attach Tubing and Bleed Kit: Connect the tubing from the brake bleeding kit to the bleeder valve. Ensure the other end is submerged in brake fluid within the container. The kit may come with instructions specific to your brake system.
Bleed the Brakes: With the brake bleeding kit, open the bleeder valve and pump the brake lever. This forces air out of the system and replaces it with fresh brake fluid. Continue pumping until no more air bubbles appear in the tubing, then close the bleeder valve. Test the brakes to ensure they are responsive and firm.
Fine-Tuning Brake System for Maximum Efficiency

Fine-tuning the brake system is crucial for achieving maximum efficiency in a vehicle’s stopping power. Think of it like adjusting the sensitivity of a musical instrument to produce the perfect note. Brake systems consist of various components such as brake pads, rotors, and hydraulic systems.
Ensuring these elements work together seamlessly is akin to orchestrating a harmonious symphony. Fine-tuning involves adjustments that optimize the brake’s response time, ensuring a prompt and precise reaction when you press the brake pedal. This not only enhances safety but also contributes to fuel efficiency by minimizing unnecessary braking force.
Frequently Asked Questions
What should I do if my brake pads are worn out?
Replace worn brake pads with new ones. Ensure the new pads match your bike’s specifications. Follow the manufacturer’s guidelines for installation, and check the alignment to guarantee optimal braking performance.
How do I adjust the brake cable tension on my electric bike?
Locate the barrel adjuster on the brake lever or calliper. Turn it clockwise to tighten or counterclockwise to loosen the cable tension. Test the brakes after each adjustment until you achieve the desired feel.
My electric bike has disc brakes. How can I address rotor issues?
Inspect the disc brake rotor for warping or contamination. Clean the rotor with isopropyl alcohol if it’s dirty. For warping, gently bend the rotor back into shape or replace it if the damage is severe. If problems persist, consult a bike technician for professional assistance.
Conclusion
Maintaining and fixing the brakes on an electric bike is a straightforward process that can greatly enhance safety and performance. Regular inspections, cleaning, and adjustment of brake components, such as brake pads and cables, are essential for ensuring optimal function.
By following the step-by-step guide on how to fix brakes on an electric bike, riders can enjoy a smooth and reliable braking experience. To prioritize safety, take the time to understand your specific bike model, and seek professional help if needed. With proper care, riders can pedal confidently, knowing that their electric bike’s brakes are in good working order.
I’m passionate electric scooter enthusiast and the voice behind this blog. I’m here to share my expertise and insights with you. From in-depth reviews to problem-solving guides, my goal is to help you make the most of your electric scooter experience.


![Gomyfinance.com Invest: I Made $5,000 in My First Month [Real Results 2025]](https://electopolo.com/wp-content/uploads/2025/05/Gomyfinance.com-Invest-I-Made-5000-in-My-First-Month-Real-Results-2025-150x150.jpg)