
Design Rule Checking (DRC) is a critical process in integrated circuit design, ensuring that the layout of a chip adheres to the manufacturing rules of the target fabrication process. Skipper, a powerful Electronic Design Automation (EDA) tool, offers robust capabilities for performing DRC and visualizing the results.
This comprehensive guide will walk you through the process of showing all DRC in Skipper using commands, providing you with the knowledge and skills to efficiently manage and resolve design rule violations in your projects.
What is Skipper?
Skipper is an advanced EDA software suite designed to streamline the integrated circuit design process. It offers a wide range of features and functionalities that cater to various aspects of chip design, including schematic capture, layout design, simulation, and verification.
Skipper’s intuitive interface and comprehensive toolset make it a popular choice among both novice and experienced chip designers. Its ability to handle complex designs and perform efficient DRC checks contributes significantly to reducing the time-to-market for new semiconductor products.
Why Is It Important to Know How to Show All DRC in Skipper with Commands?
Understanding how to show all DRC in Skipper using commands is crucial for several reasons:
- Efficiency: Command-line operations are often faster and more efficient than navigating through graphical user interfaces, especially when dealing with large and complex designs.
- Automation: Knowledge of DRC commands allows you to create scripts and automate repetitive tasks, saving time and reducing the potential for human error.
- Customization: Command-line interfaces provide greater flexibility in customizing DRC checks and reports, allowing you to focus on specific areas of interest in your design.
- Debugging: When troubleshooting DRC issues, having direct access to detailed error information through commands can expedite the debugging process.
- Version Control: Command-line operations are easier to document and integrate into version control systems, facilitating collaboration and maintaining a clear history of design changes and verifications.
How to Access the Command Line in Skipper?
Before diving into the specific commands for showing DRC results, it’s essential to understand how to access the command line interface in Skipper.
Follow these steps to open the command console:
- Launch the Skipper application on your workstation.
- Look for the “Command Console” or “Terminal” option in the main menu, typically found under “Tools” or “View.”
- Click on the appropriate option to open the command line interface.
- Once the console is open, you’ll see a prompt where you can enter commands directly.
Read This Blog: Christopher Mullich: A Beacon of Excellence at Arizona State University
Commands for Showing All DRC in Skipper
Now that you have access to the command line, let’s explore the essential commands for showing all DRC in Skipper. These commands will help you perform comprehensive design rule checks and view the results efficiently.
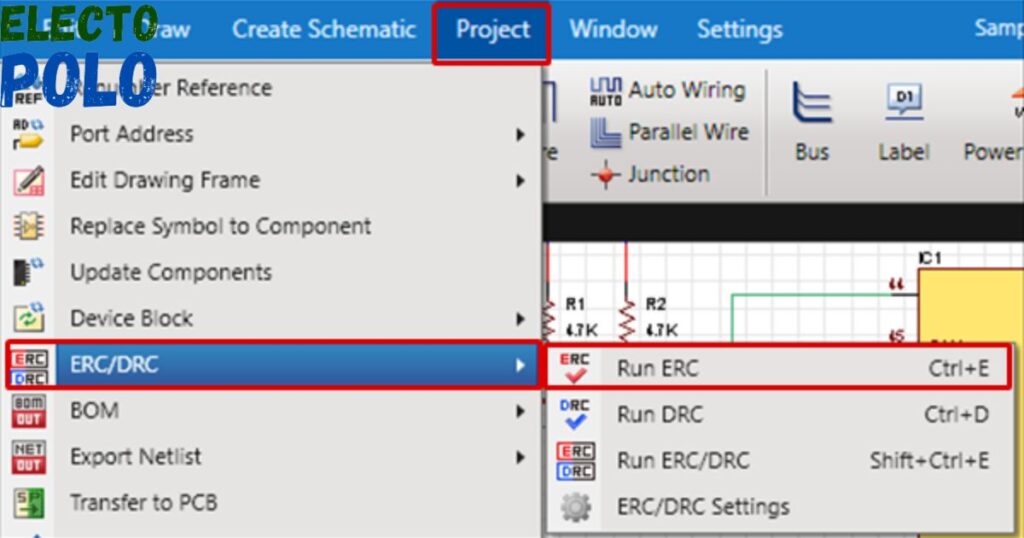
1. Initiating a DRC Run
To start a DRC check on your current design, use the following command:
run_drc -allThis command instructs Skipper to perform a complete DRC analysis on all layers and areas of your design. The “-all” flag ensures that no part of the layout is overlooked during the check.
2. Displaying DRC Results
After running the DRC, you can view the results using this command:
show_drc_resultsThis command will generate a detailed report of all DRC violations found in your design, categorized by rule type and severity.
3. Filtering DRC Results
To focus on specific types of DRC errors or particular areas of your design, you can use filtering commands:
filter_drc_results -type <error_type>
filter_drc_results -layer <layer_name>
filter_drc_results -severity <severity_level>
Replace , , and with the appropriate values based on your specific requirements.
4. Navigating Through DRC Errors
To move through the list of DRC errors efficiently, use these navigation commands:
next_drc_error
previous_drc_error
These commands allow you to step through each violation sequentially, making it easier to address issues one by one.
5. Obtaining Detailed Information on a Specific Error
For in-depth information about a particular DRC violation, use:
show_drc_error_details <error_id>Replace with the identifier of the specific error you want to investigate further.
6. Clearing DRC Results
If you need to clear the current DRC results and start fresh, use:
clear_drc_resultsThis command removes all existing DRC markers and clears the results from memory. By familiarizing yourself with these essential commands, you’ll be well-equipped to manage DRC checks in Skipper effectively and efficiently.
How to Interpret the Output When You Show All DRC in Skipper with Commands?
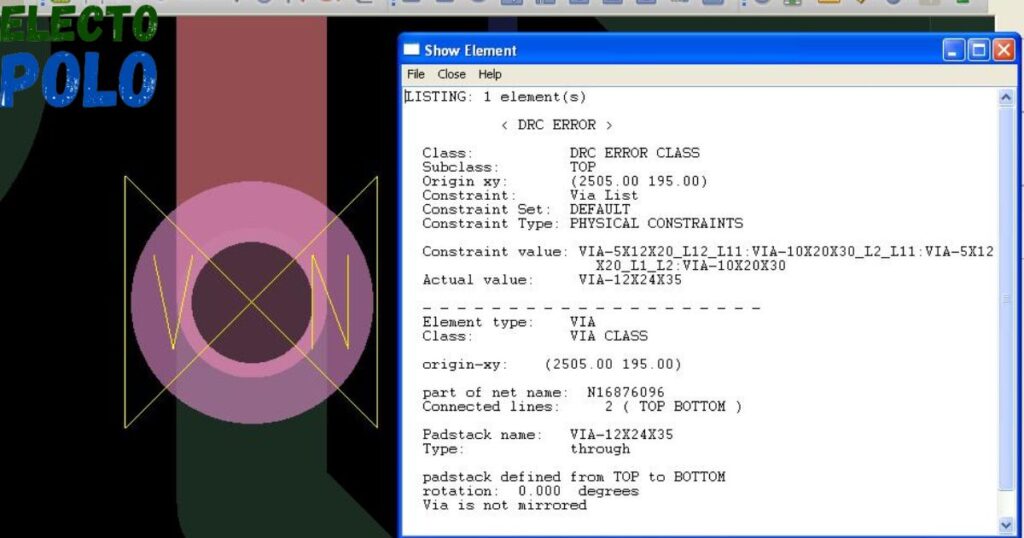
Interpreting the output of DRC commands is crucial for identifying and resolving design rule violations. When you show all DRC in Skipper using commands, the output typically includes the following information:
- Error ID: A unique identifier for each DRC violation, useful for referencing specific issues.
- Rule Name: The name of the design rule that was violated, providing context for the error.
- Severity Level: An indication of how critical the violation is, often categorized as “Error,” “Warning,” or “Information.”
- Layer Information: The specific layer or layers involved in the DRC violation.
- Coordinates: The exact location of the violation in the layout, usually given in x and y coordinates.
- Error Description: A brief explanation of why the design rule was violated and what needs to be corrected.
- Affected Objects: Information about the design elements involved in the violation, such as polygons, vias, or nets.
To effectively interpret this output:
- Prioritize by Severity: Address errors before warnings, and warnings before informational messages.
- Group Similar Violations: Look for patterns in the errors to identify systematic issues in your design.
- Cross-Reference with Design Rules: Refer to the design rule documentation to understand the specific requirements that were violated.
- Visualize the Errors: Use Skipper’s graphical interface in conjunction with the command-line output to see the violations in context.
Common Errors When You Show All DRC in Skipper with Commands
When using commands to show all DRC in Skipper, you may encounter some common errors or issues.
Being aware of these can help you troubleshoot more effectively:
- Syntax Errors: Ensure that you’ve entered the commands correctly, paying attention to spelling and required parameters.
- Incorrect File Paths: If your command references specific files or libraries, verify that the paths are correct and accessible.
- Outdated Rule Decks: Make sure you’re using the most up-to-date DRC rule deck for your target process technology.
- Insufficient Permissions: Check that you have the necessary permissions to run DRC checks and access result files.
- Resource Limitations: For large designs, ensure that your system has sufficient memory and processing power to handle comprehensive DRC checks.
Benefits of Knowing How to Show All DRC in Skipper with Commands
Mastering the art of showing all DRC in Skipper using commands offers numerous advantages:
- Increased Productivity: Command-line operations are typically faster than GUI-based interactions, allowing you to perform DRC checks more efficiently.
- Enhanced Accuracy: By directly specifying DRC parameters through commands, you reduce the risk of overlooking critical checks or misconfigurations.
- Greater Control: Command-line interfaces provide finer control over DRC settings and output formats, enabling you to tailor checks to your specific needs.
- Improved Collaboration: Sharing command scripts with team members ensures consistency in DRC procedures across your organization.
- Easier Integration: Command-line DRC checks can be easily integrated into automated design flows and continuous integration pipelines.
- Better Documentation: Commands can be logged and documented more easily than GUI interactions, providing a clear audit trail of design verification steps.
How to Save and Export DRC Results?
After running DRC checks and analyzing the results, it’s often necessary to save and export the findings for documentation or further analysis. Skipper provides several commands to facilitate this process:
save_drc_results -file <filename>
export_drc_report -format <format_type> -output <output_file>
Replace , , and with your desired values. Common export formats include CSV, HTML, and PDF.
Saving and exporting DRC results allows you to:
- Share findings with team members or clients
- Keep a record of design iterations and improvements
- Perform offline analysis of DRC violations
- Generate formal reports for design reviews or audits
Read This Blog: Official as a Body of Fiction NYT: A Comprehensive guide
Frequency of Running DRC Checks
Determining how often to run DRC checks is an important aspect of managing your design process effectively.
Consider the following guidelines:
- After Major Design Changes: Run a full DRC check whenever you make significant modifications to your layout.
- Before Design Reviews: Perform comprehensive DRC checks prior to internal or external design reviews.
- Nightly Builds: For complex projects, set up automated nightly DRC runs to catch issues early.
- Pre-Tapeout: Always run a final, exhaustive DRC check before sending your design for fabrication.
Next Steps After Resolving DRC Errors
Once you’ve addressed the DRC violations identified through Skipper’s command-line interface, consider these next steps:
- Re-run DRC: Perform another full DRC check to ensure all issues have been resolved and no new violations were introduced.
- Layout vs. Schematic (LVS) Check: Proceed with LVS verification to ensure your layout accurately represents the intended circuit.
- Parasitic Extraction: Extract parasitic elements from your layout for more accurate circuit simulation.
- Timing Analysis: Conduct static timing analysis to verify that your design meets performance requirements.
- Design for Manufacturability (DFM) Checks: Run additional DFM checks to optimize your layout for manufacturing yield.
- Documentation: Update your design documentation to reflect the changes made during the DRC resolution process.
Frequently Asked Questions
What is the difference between DRC and LVS checks?
DRC focuses on layout geometry and manufacturing rules, while LVS verifies that the layout matches the schematic.
Can I customize DRC rules in Skipper?
Yes, Skipper allows for customization of DRC rules to accommodate specific design requirements or process technologies.
How long does a typical DRC check take?
The duration varies based on design complexity and rule set, ranging from minutes for simple designs to hours for complex chips.
Are there any alternatives to command-line DRC checks in Skipper?
Skipper also offers a graphical user interface for running DRC checks, which some users may find more intuitive.
Can I integrate Skipper’s DRC commands with other EDA tools?
Yes, Skipper’s command-line interface can often be integrated with other tools and scripts for a more comprehensive design flow.
Conclusion
Mastering the art of showing all DRC in Skipper with commands is an invaluable skill for any integrated circuit designer. By leveraging the power of command-line operations, you can streamline your design verification process, improve efficiency, and enhance the overall quality of your semiconductor products.
The ability to quickly identify, analyze, and resolve design rule violations is crucial in today’s competitive market, where time-to-market and first-pass success are paramount. Remember that while commands provide a powerful interface for managing DRC checks, they are just one tool in your design verification arsenal.

I’m passionate electric scooter enthusiast and the voice behind this blog. I’m here to share my expertise and insights with you. From in-depth reviews to problem-solving guides, my goal is to help you make the most of your electric scooter experience.


![Gomyfinance.com Invest: I Made $5,000 in My First Month [Real Results 2025]](https://electopolo.com/wp-content/uploads/2025/05/Gomyfinance.com-Invest-I-Made-5000-in-My-First-Month-Real-Results-2025-150x150.jpg)